For a long time, I have recommended the Pepwave Surf SOHO router from Peplink. A long explanation of why, is on the Surf SOHO page. Finding a secure router is only half the problem, it also needs to be configured. In that light, this is a cheat sheet for configuring a new out-of-the-box Surf SOHO to be as secure as possible. It goes hand in hand with my suggestions about securely configuring any new router.
February 8, 2024: The B One (Surf SOHO replacement) is starting to ship to customers. No doubt, the B One web interface is very similar to the Surf SOHO. The Balance 20x was somewhat similar, although a few features were in different tabs.
November 2024: I hope to eventually update these instructions for the B One. That said, the user interface is very similar.
INTRODUCTION
If you own a Surf SOHO and want to start from scratch, it can be reset to factory defaults with System -> Configuration -> Restore Factory Settings button. If you can't logon to the router, look for the small reset button on the back of the router. It is, literally, a pinhole and marked with a white circular arrow. Press the button in, with a paper clip, for at least 10 seconds and the router should reboot to factory fresh state.
Before pressing the reset button, both the status and WiFi lights are green. During the reset and reboot process the lights go through these stages:
- The status light is off and the WiFi light blinks green
- The status light is solid red and the WiFi light is off
- The status light is sold green and the WiFi light is off
- Finally, the status light is solid green and the WiFi light is blinking green
You can tell that the router was reset by the Wi-Fi SSID that it broadcasts. The default is PEPLINK_xxxx where xxxx is the last four characters of the serial number. This should show up in any app or operating system when looking for nearby Wi-Fi networks.
Note: Older Peplink firmware defaulted to an SSID of PEPWAVE_xxxx
The Surf SOHO includes two copies of its operating system (called firmware). A factory reset, resets both copies of the firmware. The versions of the two installed copies do not change, just their configuration. Each is reverted to a factory fresh state.
New Surf SOHO owners can download the User Manual from Peplink at peplink.com/support/downloads/. There are different downloads for different hardware editions of the Surf SOHO. The first release is known as HW1 (hardware version 1). The second release is known as HW2 and the third release of the hardware is referred to as MK3. If you are dealing with an older, first generation model, note that it can only run firmware version 6 and as of 2024, I would not consider it a reasonable option. The two later hardware versions can run version 8 of the firmware, which ended at 8.3. No reason to use anything other than version 8.3.
STRATEGY: As I describe on the new router page, I think it is best to make some initial configuration changes to any new router while the new router is off-line (not connected to the Internet). Also, the first few times any new router goes online, it is safer for it to be sitting behind an existing router. To do this, connect an Ethernet cable from the WAN port of the new router to a LAN port of the existing router.
TERMINOLOGY: WAN refers to the Internet, it stands for Wide Area Network. LAN refers to the network of computing devices in your home/office. It means Local Area Network.
The only requirement for configuring the Surf SOHO is a web browser. Any recent browser should be fine. You could use a phone or tablet, but a computer is better, both because typing is easier on a keyboard, as opposed to glass, and because the web interface is designed for a large screen. Any computer should work, even a Chromebook. Peplink does offer a mobile app, but the initial configuration requires the web interface.
NOTE: Only once have I had an issue with a web browser extension. One page of the Peplink web interface (I think it was the Event Log display) does not display completely if uBlock Origin is enabled. Just the one page. Beats me why. Disabling uBlock Origin for the Peplink web interface fixes this.
One thing you will need, at least at first, is some patience. There are a lot of steps. And, the web interface has an unusual quirk, oftentimes clicking on a SAVE button is not sufficient to actually save the changes you made. An extra step is normally needed: clicking on an Apply Changes button in the black horizontal stripe across the top of the screen. The Apply Changes button is hidden before any changes are made and becomes visible only when you need to push it. On the upside, this lets you make multiple changes and apply/install them all at once. If you change your mind after SAVEing a change and before APPLYing it, you can back out the pending changes at the home screen (aka Dashboard).
Two things we do not need to do with a Surf SOHO are disabling WPS and UPnP. No Peplink router supports WPS which is great for security. Likewise, Peplink is the very rare company that disables UPnP out of the box. Likewise, both NAT-PMP and Remote Administration are disabled by default, both of which are good for security.
If the Surf SOHO is replacing an existing router, then you might want to go into the administrative interface of the existing router to make a note of the MAC address on the WAN/Internet side. The MAC address is a unique identifier and, almost certainly, visible to your Internet Service Provider (ISP). Some ISPs, for security, will only connect with the MAC address they already know. Thus, any new router might be blocked. While a phone call to the ISP should clear this up, the Surf SOHO, like many routers, can fake the MAC address of its WAN Ethernet port. To do so in firmware 8.1: Network tab -> WAN -> Details button -> MAC Address Clone.
To get a feel for using the Surf SOHO, see this introduction to the User Interface video created by 5G Store. It is based on firmware 8.1.1 which was the latest in Feb. 2021 when the video was made.
This was originally written for firmware version 7, the changes in version 8 are not drastic.
CONNECTING TO THE ROUTER
First things first. When the router is powered on, watch the Status LED. It is solid red while the router is starting up and changes to solid green when it has finished booting. FYI: the WiFi LED will be green and blinking when all is well and Wi-Fi is being used.
As with any router, we can connect to the Surf SOHO via Ethernet or Wi-Fi. Most computing devices use DHCP which means they will be assigned an IP address by the router. If you have that rare device with a hard coded IP address (you know who you are), it will need to be changed to something in the 192.168.50.x subnet.
It is best to connect via an Ethernet cable because we will be making changes to the Wi-Fi environment and no one wants to change a tire while the car is moving. Also, an Ethernet connection is usually more reliable than Wi-Fi and does not require a password. Connect to any of the four LAN ports, do not connect to the WAN port. If you are using a laptop computer, turn off the Wi-Fi to insure it communicates only via Ethernet.
At this point the router should be off-line, so verify that nothing is plugged into the WAN port. If the Surf SOHO is on, power it off (pull the plug), wait a bit, then power it on and wait for the status light to turn solid green. Then, I suggest restarting your computer to insure it gets assigned an IP address by the router.
Before doing anything, you might want to check that the Ethernet LAN Ports all work. If one is bad, it is best to know immediately. Don't ask why I make this suggestion. You can skip this and do it later. To test a LAN port, open a command prompt and try to ping the router using this command: "ping 192.168.50.1". This should work fine. Then plug into each of the other three LAN ports and do the same Ping command. Wait 5-10 seconds after plugging into the LAN port before doing the Ping. On a Chromebook, first disable the WiFi. ChromeOS tells you if it has connected to the Ethernet port.
If you are connecting via Wi-Fi go ahead and connect now. Look for an SSID like PEPLINK_xxxx where xxxx is the last four characters of the router serial number.
The default Wi-Fi network is password protected and the password is the last eight characters of the LAN MAC address. You can find the LAN MAC address on a label on the bottom of the router. To me, the font was too small to read, I had to take a picture of it with my phone.
A MAC address consists of letters and numbers. The letters used in the default Wi-Fi password are all upper case. Any circles are zeros, the letter OH is not valid in a MAC address. The MAC address is printed on the label with dashes between every other character. For the default Wi-Fi password, ignore the dashes.
To sum this up with an example: if the label on the bottom has a LAN MAC of
10-56-DA-58-BC-23
then the Wi-Fi password is
DA58BC23

Open your web browser of choice and navigate to http://192.168.50.1. You should see a screen like the one above asking for a userid and password. Note that the Balance 20x defaults to 192.168.1.1 out of the box. Logon with userid "admin" and password "admin". The journey has begun.
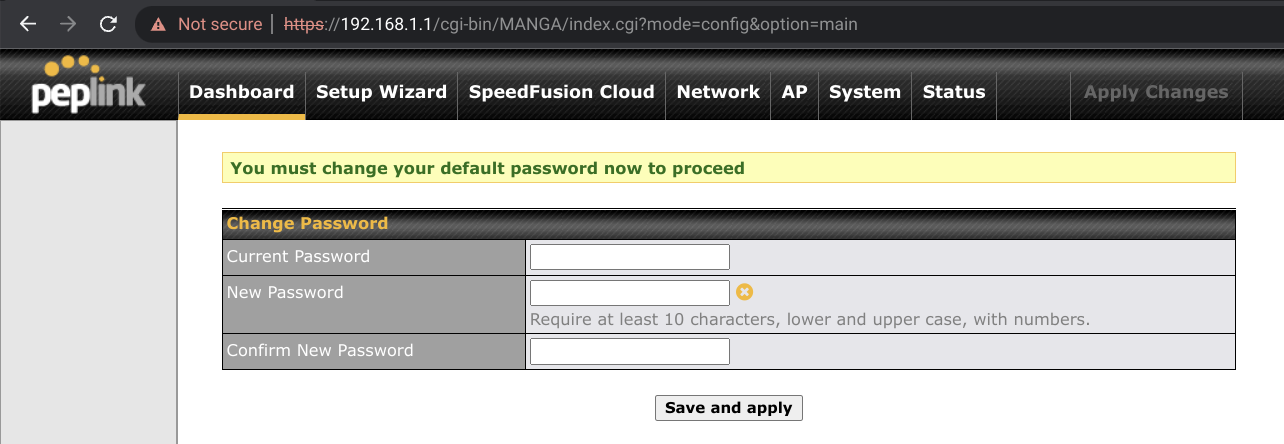
Starting with firmware version 8, after this initial admin-admin logon, you are forced to change the router password. See a screen shot from a Balance 20x. The default, out-of-the-box password works only once. The password rules are actually displayed (who does that?), it must be at least 10 characters long, include an upper case letter, a lower case letter and a number. Special characters are allowed but not required. Firmware version 6 was too forgiving, it let you keep using the default userid/password.
Before changing the default Wi-Fi network names (SSIDs) and passwords, I think it is best to control access to the router itself.
INITIAL CHANGES (OFFLINE)
After logging on, go to System -> Admin Security. The screen shot below shows what this might look like after making the changes in this section.

The first thing I suggest changing is the router administrator userid. As shown above, the userid field is "Admin User Name" and the password field is "Admin Password." You have to enter the password twice.
A userid of your name or the name of your pet would be fine. Better still, come up with something that no one might guess. Write it down on a piece of paper along with the password. Userids are case sensitive so be careful when writing it down that you can tell upper from lower case.
FYI: If you enter an incorrect password too many times, when logging on to the router, it will lock you out for a period of time.
Click the gray SAVE button at the bottom, then the Apply Changes button at the top, then logoff using gray LOGOUT button in the left side vertical column. Log back in with your new userid and new password and go back to System -> Admin Security again.
The Surf SOHO supports two userids. The one we just changed has full access to the router, there is also a read-only user. You may never use the read-only user but, even then, it is best to change the default values. As seen above, the fields are labeled "Read-only User Name", "User Password" and "Confirm User Password". Yes, the password fields are poorly labeled. Write down this userid/password too.
You might want to change the web session timeout. This is the amount of time doing nothing after which the logon to the router gets expires. The default of 4 hours seems a bit much to me, but there is no one right answer. "Authentication by RADIUS" should be off (it defaults to off). Likewise "CLI SSH & Console" should not be checked (by default it is not checked).
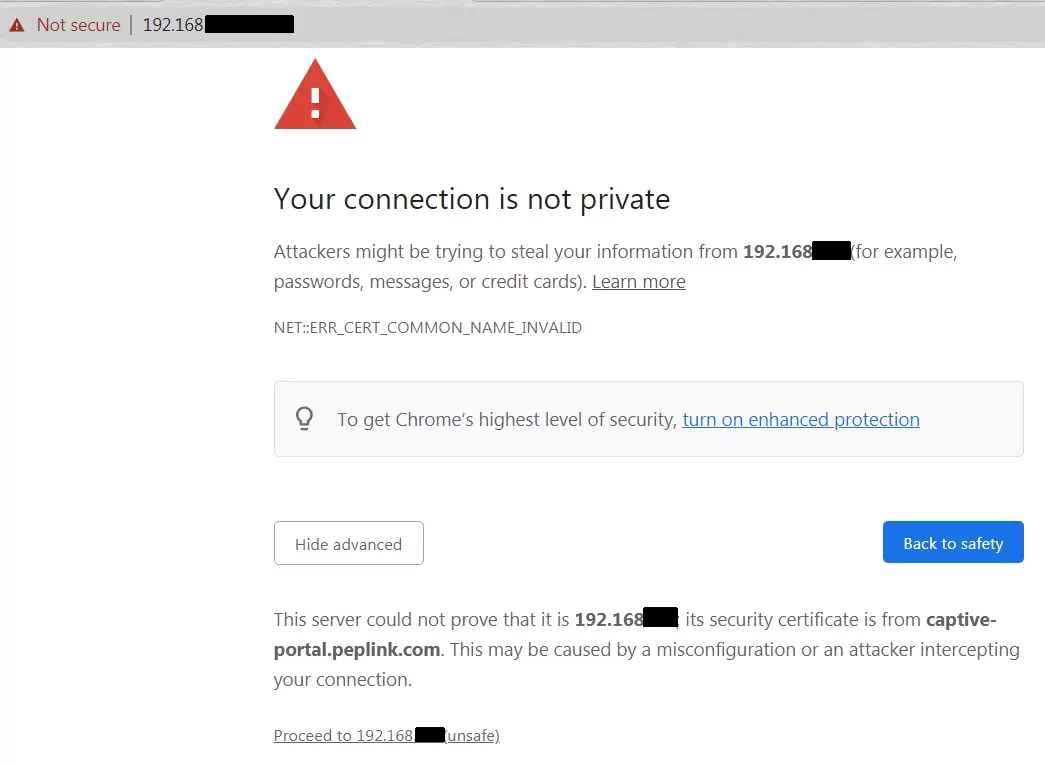
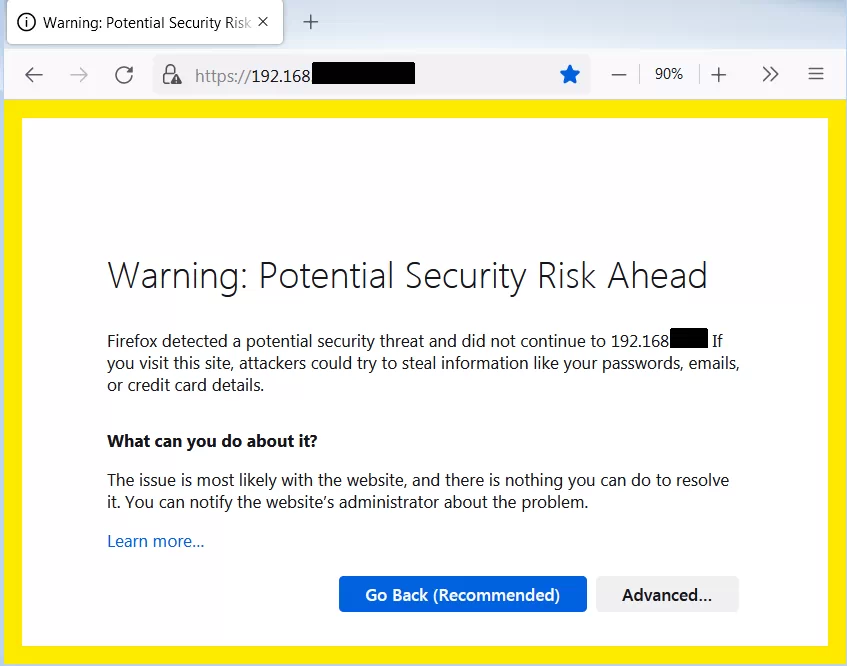
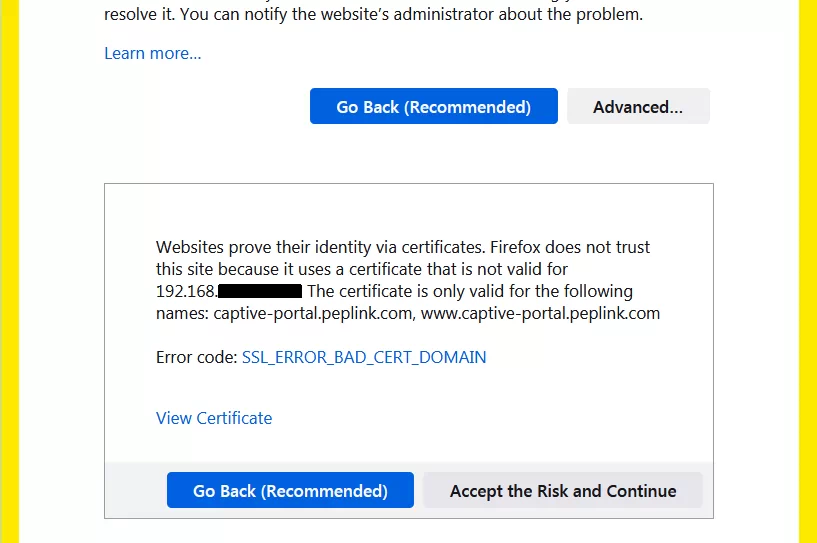
The security that the "Security" field refers to is how we access the web connection to the router that you are now using. The choices are "HTTP", "HTTPS" and "HTTP/HTTPS". This translates to always insecure (HTTP), always secure (HTTPS) and both are allowed. Needless to say, I would go with the always secure option (HTTPS). Be aware, however, that every initial HTTPS connection to the router will generate an error message in your web browser. This is, believe it or not, normal. The message varies by browser but it will typically warn that the connection is not private or not secure. This is bogus.. See a screen shot from Chrome 91 on Windows. First there is a warning, then more info, then you agree to load the website. These screen shots are from Firefox 90 on Windows: initial and more details. The certificate warnings are because captive-portal.peplink.com is not the same as an IP address. Well, duh. HTTPS offers both encryption and identity verification. These messages are due to the identity verification not working and it can never work when accessing a website by an IP address. But, even without the identity verification, we still get the encryption of in-flight data. Whew. It is ironic that the most secure option generates warnings about not being secure. Bad design by the web browsers.
The "Web Admin Access" field is where you enable or disable Remote Administration. The default setting of "LAN Only" means no Remote Administration and is the secure choice. A value of LAN/WAN enables Remote Administration. That said, this only applies to classic or legacy remote access to the router. It has nothing to do with the Peplink cloud service, InControl2, that also provides remote access to their routers. More about InControl2 later.
I suggest changing the "Web Admin Port" to something between 9,000 and 65,000. Using a non-standard port makes the router a bit more secure. But, it is yet another thing for you to remember, so write it down too on the same piece of paper as the earlier passwords.
Finally, a trivial thing, change the "Router Name" to something that makes sense to you (i.e. MikeysRouter).
Click the gray SAVE button at the bottom of the screen, then Apply Changes at the top.
If you changed either the port number or the HTTP/HTTPS, you will need to change how you access the router. The error message "Unable to reach web admin. Connecting in 30s..." is a hint that something needs to change. Non-standard ports need to be specifically entered in the URL. For example, if you picked port number 9001 and HTTPS, then you need to use
https://192.168.50.1:9001
to get to the router. The port number is preceded by a colon, not a period. I suggest writing this down too (or bookmarking it). All that said, you may need to change this yet again, if you decide to assign a different IP address to the router (which I suggest doing, more on this below).
At this point, I suggest changing the time zone at System -> Time. The time zone determines the timestamps in the Event Logs and thus is not the sort of thing you want to change after using the router for a while. After changing the time zone, the firmware suggests rebooting the router, and I certainly agree. The default Time Server should be fine. If you do change the Time Server, click the gray Save button. When I last checked, the router phones home for the time of day every 30 minutes.
STATUS -> DEVICE

After logging on, go to Status -> Device and write down the Serial Number. Also note the "Model" and "Hardware Revision" Hardware versions 1 and 2 are labeled as such. Someone at Peplink screwed up when it came to naming the third generation of the Surf SOHO hardware. Hardware Revision 3 identifies itself with "MK3" in the Model field.The Hardware Revision field, for a third generation model, is labeled as version 1. This is a bug, not a feature.
The current Firmware version is also shown here. While the router can check for new firmware, I suggest also checking the Peplink website.
PepVPN is an advanced feature that should be ignored for now. The Modem support version can also be ignored initially. The modems it refers to are 4G/LTE devices that plug into the USB port of the router to provide wireless Internet access. This has nothing to do with cable or DSL modems.
The Diagnostic Report is for Peplink, not for you. If their tech support department is working on a problem with your router, they may ask for this. Remote Assistance is also for Peplink tech support. It lets them access your router, again, when working on a problem for you. Hopefully, you will never have to use it.
STATUS -> EVENT LOG
Now click on the Event Log in the left side vertical column. It is your friend. Verify that the checkbox to Auto-Refresh is on (it should be). You should see timestamps on the left and event messages on the right. There should always be some messages as the router logs when it starts up and every time someone logs on to it. Until the router goes on-line and asks the Internet for the current date and time, event log messages will default to January 1st.
NOTE: If you don't see any messages in the Event Log, the problem might be with your ad blocker. I learned the hard way that uBlock Origin breaks this page. Just this one page. Don't know why that is. It is a simple matter, however, to disable uBlock Origin on either the entire router website (192.168.50.1 by default) or on just this one page (192.168.50.1/cgi-bin/MANGA/index.cgi?mode=config&option=utlog). Click on the uBlock Origin icon in the top right corner of the browser window and follow the instructions.
NOTE: If you don't seen enough messages in the Event Log, scroll to the bottom and look for "More..." in the bottom right corner. Hover the mouse over this to display older messages. You can do this more than once.
STATUS -> CLIENT LIST
This is also a good time to get your first look at the list of clients attached to the router (Status -> Client List). You can click on the Name column for any device and give it a name that makes sense to you (Susans ipad, LivingRoomPC). There is a lot of information here in a short easily digested format. No doubt the Wi-Fi signal strength will come in handy. Note that the lower the number the better. For example, -38dBm is a very high signal strength while -66dBm is poor but usable. Often the MAC address will not be very interesting, but, you hover over the MAC address, while the router is online, it will pop-up a balloon with the name of the company that made the network adapter.
AP TAB WI-FI
To configure Wi-Fi go to the AP tab (AP is for Access Point). By default you will be at Wireless SSID in the left side vertical column. SSID is nerd talk for the name of a wireless network. There is, by default, a single Wi-Fi network with an SSID of Pepwave_xxxx where xxxx is the last 4 digits of the router serial number.
Click on the default SSID. The screen shot below shows how this might look after making the changes suggested in this section.

Change the name (SSID field) to something that makes sense to you. For more on this see the SSID page. Change the "Security Policy" to WPA2 - Personal. Do not use either of the WPA/WPA2 options. This is a rare setting where the default value is not the most secure option.
The "Shared Key" field is the Wi-Fi password and it needs to be long. How long is debatable, but at least 11 characters and, it is far better, if its 15 characters or even longer. The password does not need to be random junk (3kFezcfIUIU3*wqmj), however. As a starting point, use two words and a number (99REDballoonz or route66HIghway). For more see the page on Wi-Fi passwords. The default Wi-Fi password is the last 8 digits of the LAN side MAC address.
IGNORE THESE SETTINGS: You can ignore the VLAN ID (if it even appears) for now. There is more on VLANs below. Broadcast SSID is checked by default and should remain checked. Some articles suggest that not broadcasting the network name is a security feature, but it offers very little security. Even if you wanted to do this, its best to do it later, not initially. The "Enable" field refers to the scheduled availability of the Wi-Fi network. Perhaps you want to turn off Wi-Fi at night, thinking that a network that does not exist, can't be hacked. There is more about scheduling below in the section "A NETWORK FOR THE KIDS." Scheduling is optional and is best left for later. The Access Control Settings are for MAC address filtering, a security feature that does not provide much security, so it can be left with the default value of "None".
As before, click the SAVE button at the bottom, then the Apply Changes button at the top.
For the time being, a single Wi-Fi network is enough. The Surf SOHO can create many Wi-Fi networks but the others can be created later.
IP ADDRESSES and SUBNETS
The next thing to change is the LAN side network numbering scheme. For more about this, see the IP address page. An IP address consists of four decimal numbers separated by periods. All the devices connected to the router will, at least initially, share the same first three numbers. Those three numbers define a subnet (sub network).
The Surf SOHO defaults to the 192.168.50.x subnet. This means that all devices connected to the router will have a LAN side IP address that starts with 192.168.50. The router itself, as we have already seen in the web browser, is 192.168.50.1. Changing these defaults makes for better security. Many routers use a subnet that starts with 192.168. The other popular subnets are those that start with 10.
If the first digit is ten, the next two numbers can be anything between 0 and 253. I suggest not using 0 or 1. Also, do not use 10.0.0.x, 10.0.1.x, 10.1.1.x and 10.10.10.x. The IP address page has subnets to avoid because assorted routers already use them. On a technical level you can chose any network that starts with 10 or 192.168, but choosing one that no one else is using makes you just a bit safer. Some easy to remember networks would be 10.11.12.x and 10.20.30.x. If you live at 123 Main Street, then maybe use 10.123.123.x.
Another choice that needs to be made is the IP address of the router. Typically, it is assigned the number 1, so on a network where everything is 10.123.123.x the router would be 10.123.123.1. Using any number other than 1 makes things more secure.
The final issue with subnets is how devices get their IP addresses. Most of the time, the router assigns the IP address for a day or so and then the devices call back to the router for a new assignment. Devices thus get dynamic IP addresses and the protocol for this is DHCP (where the D is for Dynamic). Devices can also be configured with their own IP address that never changes and thus not be dependent on the router or DHCP. A device with a never changing IP address is said to have a static IP address. Devices such as a network printer or a NAS (Network Attached Storage) function a bit better with a static IP address.
Putting this all together, we might end up using
10.123.123.x as the subnet
10.123.123.3 for the router
10.123.123.20-250 for dynamically assigned IP address (DHCP)
The remaining IP addresses, 1, 2 , 4 through 19, 251, 252 and 253 can be used by devices with static IP addresses. This scheme allows for up to 230 devices to get dynamic IP addresses. This should be sufficient for most people most of the time.

To make these changes, go to the Network tab, then Network Settings in the left side vertical column (it should be the default). Then click on the Untagged LAN to see the screen shown above (from firmware 8.1.2).
In the "IP Address" field, enter the IP address of the router (10.123.123.3 in our example). Do not change the numbers to right of this, the default (255.255.255.0 /24) is just fine.
As for a Name, "MikeysPrivateLAN" seems a bit more user-friendly than "Untagged LAN". Initially, I suggest having both Inter-VLAN routing and Drop-in Mode turned off.
The DHCP server should be enabled. I like to enable DHCP Server Logging too as it creates an Event Log entry when a device connects to the router. These log entries can be handy as an audit trail.
In the "IP Range" field enter 10.123.123.20 and 10.123.123.250. Again, do not change the third set of numbers from its default value (255.255.255.0 /24). The Lease Time defaults to 1 day (I think) and that should be fine as a starting point.
No need to change DNS Servers (checked on by default) or BOOTP (off by default) or to add any Extended DHCP Options.
The DHCP reservation shown above (for someNASbox) is not needed initially, it is there just as an example. This is where you tell the router to always assign the same IP address to the same device. Some of us find that it is much easier to refer to network devices like a NAS or a printer by a fixed/static/reserved IP address. In the example, I defined a NAS box to always use IP address 10.123.123.4 which is outside the range used by DHCP (20 thru 250).
Click the SAVE button at the bottom, then Apply Changes at the top.
As before, when we changed the port number, these changes will cause you to lose contact with the router. It is best at this point to reboot the router, wait a minute for it to start up, then re-start the computer you are using so that it can be assigned a new IP address in the new 10.123.123.x subnet. Then, finally, point your web browser to
https://10.123.123.3:portnumber
For example, if the "Web Admin Port" number you assigned was 9001, then you access the router with
https://10.123.123.3:9001
At this point, you can bookmark this, it should not change going forward.
This ends the initial off-line setup.
NOTE: The above discussion assumes that the router will be plugged into a modem, which is the normal environment. This lets us pick any technically valid subnet, such as 10.123.123.x. However, a router can be plugged into another router or a gateway (combination modem and router in one box). That is, there can be an inner router and an outer router (my terminology). The outer one is connected to a modem normally. The Ethernet WAN/Internet port of the inner router is plugged into a LAN port of outer router. I blogged that A second router can make working from home much more
secure.
I bring this up here, because the inner router must use a different subnet than the outer one. Since most routers use 192.168.something, anything that starts with 10 should be fine for the inner router. Still, if you can, it would be best to learn what subnet the outer/pre-existing router is using. Every device knows its LAN side IP address, so even without access to the outer router, just see what IP address a device connected to it is using. That will tell you the subnet (or close enough).
Another potential conflict, with an inner and outer router, is Wi-Fi. It is safer, but not mandatory, to disable the Wi-Fi on the existing router/gateway. If you want to keep the pre-existing Wi-Fi network(s), use it/them only as a guest network. If your ISP gave you a combination modem/router (aka gateway), then once the new/inner router is working, you can try to dumb-down the box to act merely as a modem, a mode of operation normally called bridge mode. Thanks to Zach for bringing this up.
UPDATE FIRMWARE
With the preliminaries out of the way, this is a good time to update the firmware. Granted, there is a chance that the new router has the latest firmware, but its a pretty small chance.
The Surf SOHO can update its firmware either online or off-line. Off-line is a manual process - you download the new firmware onto the computer connected to the router and then point the router to a .bin file that is the firmware. On-line is more automated, there is no downloading or uploading. However, on-line is only an option if the router detects the availability of new firmware and the track record here is not good. Off-line updates are also called manual updates.

The definitive source for firmware is the Peplink website, specifically the download page at peplink.com/support/downloads. The Surf SOHO section of the page is shown above (as of April 2020), you need to scroll down to find it. You should always check this page first to learn the latest firmware. As of April 2020, the latest firmware for the first generation Surf SOHO (HW1) is 6.3.5 and the latest for both the second (HW2) and third (MK3) generations is 8.0.2. You can also download the Release Notes for the latest firmware and the full User Manual.

Firmware updates (both online and off-line) start at System ->Firmware. Click the "Check for Firmware button".
If it finds the latest firmware, you are good to go, the process is self-explanatory. If it does not detect the latest firmware, then download it from the Peplink website. The firmware should be a single file that ends with .bin. Somewhere in the file name will be the version number and a build number.
Another reason to do an off-line/manual firmware update is that you don't want to put the new router online with old firmware, even if it is behind an existing router. If you don't have another router to shield the new one, this is an excellent reason.
A manual update starts with the "Choose File" button. Point it to the .bin file, then click the "Manual Upgrade" button. The file is uploaded to the router, then it is validated by the router. Next, you will see an orange progress bar and be warned that the upgrade may take up to 6 minutes, which is a reasonable approximation. When the process completes, you will be at the login page.
After logging in, look for the new firmware version on the Dashboard page (the Dashboard is the first page you see after logging in). Then, just for fun, go to System -> Reboot where you will see one of the biggest advantages to using a Peplink router. Should the new firmware cause grief, you can easily reboot the router back to the previous firmware. You can also check the Event Log. The message "System: started up" includes the firmware version.
Another great thing about Peplink, is the ability to save the current router settings. In the absolute worst case, where you have to reset the router to factory fresh state, you can then import these saved settings and not have to re-do all the changes on this page. The icing on this cake is that you don't even have to remember this, the router will remind you to save the current settings before updating the firmware. Just great.
At this, point we have not made all that many changes, but still, I suggest saving the current configuration settings just for the practice. You can save the settings at any time from System -> Configuration -> Download Active Configurations section -> gray Download button. The downloaded file is very small. The name starts with the date in yyyymmdd format and ends with .conf.
Note that the format of the settings backup file has changed between firmware 8.2.1 and 8.3. When upgrading to firmware 8.3, it is best to backup the current settings both before and after. If you are currently running firmware 8.3 or 8.4, then be aware that old backups of the system settings are outdated and you should make a new backup.
MANAGING TWO FIRMWARES
Normally as new firmware is released, you keep upgrading to the latest version with the prior version also installed and serving as a fallback. For example, when firmware 8 was released, it started at 8.0, then came 8.0.1 and 8.0.2. Thus, the normal progression would be:
7.1.2 and 8.0
8.0.1 and 8.0
8.0.1 and 8.0.2
But, you can take more control over this. Supposed you wanted to remain on firmware 7 but still be able to kick the tires on these new firmware versions? This is indeed possible. After first installing 8.0, the two installed versions are 7 and 8. To update from 8.0 to 8.0.1 while still keeping version 7, all you need do is be running firmware version 7. If so, 8.0 will be replaced by 8.0.1 with version 7 still available. Then, do the same thing to upgrade 8.0.1 to 8.0.2, while keeping version 7 installed. Thus, the progression over time of the two installed firmwares would be:
7.1.2 and 8.0
7.1.2 and 8.0.1
7.1.2 and 8.0.2
This is really great.
VLANS
If the Surf SOHO is currently connected to the Internet, disconnect it now.
This is a great time to create your first VLAN. Detailed instructions are on the VLAN page. That page starts with an introduction to VLANs and network segmentation/isolation. You can think of VLANs as the way Peplink implements Guest networks. Not a great analogy, just a starting point.
If you just want click-here, type-this barest minimum instructions for getting started with VLANs, here you go:
- From the Network tab, go to LAN, then Network Settings
- In the "IP Settings" section at the top of the page, click on the white question mark in the blue circle. A small window pops up saying "If you need to define multiple VLANs, press here". Click on the word "here". A second window pops up that says "The LAN settings will be switch to advanced mode with VLAN support. Are you sure?" CLick on the Proceed button.
- Click on the Apply Changes button which will take you back to the Dashboard page
- Go back to Network -> Network Settings
- Click on "Untagged LAN" and turn off the checkbox for Inter-VLAN routing.
- Click on the "Untagged LAN" and rename it to something like PrivateLAN or PrivateNetwork or MikeysPrivateNetwork. Click the Save button, then Apply Changes.
- Back to Network -> Network settings. Click the New LAN button.
- Make the IP address 10.22.22.2. Make the name "Guest-VLAN". Make the VLAN ID 22. Set Inter-VLAN routing off.
- Enable the DHCP server and DHCP Server Logging.
- Set the IP range to 10.22.22.50 through 10.22.22.240 and the field just after this to (255.255.255.0/24)
- Turn on checkbox to Assign DNS servers automatically
- Click the Save button then Apply Changes
- Block all VLAN users from accessing the router: System -> Admin Security -> Allowed LAN Networks -> Allow this network only. Set this to the private network using the name from step 6 above.
The just-created VLAN (Guest-VLAN, aka number 22) can be assigned to zero, one, two or even more wireless networks. As a start, assign it to a single network/SSID. VLANs and Wi-Fi networks can both be created, deleted, renamed and re-assigned at any time, so whatever you do now can always be changed later.
WI-FI SETTINGS
There are many Wi-Fi settings that are not tied to one specific SSID. To configure these, go to the AP tab, then Settings as shown below (HW2 Firmware 7.0). First, verify that the Country is correct. What you see here varies depending on whether you are using the 1st, 2nd or 3rd generation of the Surf SOHO.

The first two generations (HW1 and HW2) could only use one Wi-Fi band at a time. That is, you had to choose either 2.4GHz or 5GHz. The choice was made by selecting a Protocol of 802.11ng for 2.4GHz or 802.11na for 5GHz. This is shown above.
The first two generations of the Surf SOHO let you chose between their internal antenna or the optional external antennas. This is not an option with the third generation (aka MK3) which seems to have done away with the internal antenna (along with adding a third external antenna).
The 3rd generation can use both Wi-Fi frequency bands concurrently. By default, it broadcasts each SSID on each frequency band, which, I suspect, is what most people want most of the time. If not, you can restrict an SSID to a single frequency band as shown below. In the SSID section, what I have blocked out are the names of the five SSIDs defined in my Surf SOHO. Two use only 2.4GHz, two use only 5GHz and one SSID is not used at all.

On 3rd generation hardware with firmware version 8, the "Wi-Fi AP Settings section" (shown above) is a bit confusing. In the "Wi-Fi AP Settings" section, the left side column controls the 2.4GHz radio, the right side is for 5GHz. For 2.4GHz, a Protocol of 802.11ng means it is using both Wi-Fi N and G. This seems to be the only choice (at least with firmware 8.0.2). For 5GHz, you want to use 802.11ac (do not use 802.11na).
When it comes to Channel Width, there is no one right answer. Also, Wi-Fi will work no matter what you pick here, it will just work faster with a better choice. Wider channels transmit more data, and thus are faster, but they are also more likely to suffer and cause interference from/by nearby networks. That said, on the 2.4GHz band, the Surf SOHO defaults to using narrow 20MHz wide channels which is pretty much an industry standard and is certainly what you should start with. Only if there are no Wi-Fi networks anywhere nearby should you consider bumping this up to 20/40MHz or 40MHz.
On the 5GHz band, the 3rd generation Surf SOHO defaults to using relatively wide 80MHz channels. The first two generations can only use a channel width of 20MHz or 40MHz. As with the other frequency band, wider channels are faster but interfere more with your neighbors, which just slows everyone down. In a very crowded area, the safest choice is a narrow 20MHz wide channel. If there is no Wi-Fi anywhere near you, then a wide 80MHz channel width will be faster. Probably, most people should start with a 40 MHz channel width. You may need some trial and error here.
Like any router, you can either let the Surf SOHO dynamically choose a channel or set it to always use one specific channel. On the 2.4GHz band, experts agree that the only channels anyone should use are 1, 6 and 11. All the rest interfere with each other. It is better for everyone involved if two nearby networks both use channel 6 (for example) as opposed to one using 5 and the other using 6. Many routers use these wrong channels.
The Surf SOHO (all generations) offers a third choice. It can automatically choose a channel, but you can restrict its choices to just 1, 6 and 11. The same feature exists on the 5GHz band, just with different channels. If, for example, you know that a nearby network always uses a specific channel, you can use this feature to insure that your router will never use that channel, but still let it dynamically choose from the remaining channels. I have not seen this feature in any other router. To set this up, select "Auto" for the Channel parameter and then click the Edit button (not shown above). There will be a checkbox for each possible channel, uncheck the channels you want to avoid.
Wi-Fi experts can click on the white question mark in the blue circle for advanced Wi-Fi options such as the Beacon Rate, Beacon Interval and the RTS Threshold. These settings are, frankly, beyond me. Fortunately, there should be no need adjust these advanced settings.
SETTINGS FOR ONE SSID
To configure an individual Wi-Fi network (SSID) the settings are mostly standard and fairly self-explanatory. In firmware 8, you get to the list of networks from the AP tab, then Wireless SSID in the left side vertical column (it should be the default). The screen shot below shows a Surf SOHO with six defined SSIDs (orange-d out for privacy reasons). The router can create up to eight networks.

Clicking on the name of a network, gets you to the screen below. Or, click the gray New SSID button to create a new network/SSID.
If you have enabled VLANs, then each SSID must either be assigned to a VLAN or assigned to the non-VLAN shared network, which techies call the untagged network or untagged LAN. Rather than use this obscure term, in the example below, the non-VLAN shared network is called MikeysPrivateLAN. There is a drop-down list of the available VLANs which shows both the VLAN name and number.

The "Security Policy" is very important, it refers to the over the air encryption scheme. Different SSIDs can have different Security Policies. For many years, this has been an easy decision, just use WPA2 - Personal. There is nothing wrong with WPA2 (as of March 2022) but the newer WPA3 is also a good option. The WPA2 WPA3 WiFi Encryption page has more on the improvements in WPA3. The big issue with WPA3 is that many devices do not support it and may never support it. As soon as I changed one of my networks from WPA2 to WPA3, an Internet radio could no longer get online. The improvements with WPA3 are, in my opinion, minor, so sticking with WPA2 is fine. Or, you can use them both. The WPA2/WPA3 - Personal option will use either WPA3 or WPA2, depending on what the client device supports. Or, you can have one SSID use WPA3 for the devices that support it, and another SSID use WPA2 for devices that do not support WPA3. For an initial setup, WPA2 - Personal is the way to go. You can tweak this later.
The worst choice is Open, which means no encryption. I would never use it. The two WPA options are not very secure and should not be used. That leaves WPA2 - Enterprise. Enterprise networks are a step up from Personal ones, both in terms of security and complexity. They are typically used by large companies and certainly not something to deal with during the initial setup. Rather than a single password, each Wi-Fi user gets their own password. In the screen shot above of the AP tab (showing six networks), two are using WPA2 - Enterprise. This is because I use it at home on two of my SSIDs. The WPA2 WPA3 WiFi Encryption page has more on WPA2 - Enterprise networks.
"Shared Key" is nerd lingo for the Wi-Fi password. It is best to use a Wi-Fi password that is at least 14 characters long. See more on the Wi-Fi passwords page.
You can ignore the "Encryption" as it is always AES:CCMP with WPA2 and WPA3, which is the right thing to do.
The screen shot above is also an example of scheduling, which is optional. The field labeled "Enable" should really be called "Scheduling". The "MikeysWifi" network has been assigned a schedule of "OffFrom1to6am" which could be anything. In the previous screen shot (the AP tab listing six networks) you may have noticed that the first WPA2 - Enterprise network has a small orange clock in the SSID column. This indicates that the SSID is assigned to a schedule. There is more on scheduling below.
You can ignore the Access Control Settings section. This is commonly known as MAC Address Filtering and is usually not worth bothering with. You can also leave the "Broadcast SSID" field checked. Not broadcasting the name of your network(s) is slightly more secure, but rarely worth the trouble.
FYI: If you want to disable Wi-Fi altogether, this is done on the Dashboard page (the page you first see when you log in to the router). In the WiFi AP section, there is an ON/OFF toggle next to the gray Details button (verified in firmware v7 and v8). When it is off, the Dashboard says "Wi-Fi AP has been disabled" and the WiFi status LED on the front of the router goes off. If you intend to keep the Wi-Fi off all the time, I would nonetheless change the default SSID and password. Being a pessimist, I say this just in case the Wifi is turned on by accident.
A NETWORK FOR THE KIDS
The great thing about being able to create many wireless networks is the flexibility. Perhaps you might have one network for normal family use, one for when a parent is working from home, one for IoT devices, one for Guests and one for children that cuts them off from the Internet at bed time. This section describes how to limit children. The Surf SOHO can not limit children to a certain number of hours, but it can limit their access by time of day.
First, insure that Scheduling is enabled system wide. You do this at System tab -> Schedule. The box labeled Schedule will say either Enabled or Disabled. The checkbox to switch the status is hidden, click the box on the far right to reveal it.
To schedule the availability of a network/SSID, you first create a Schedule (System tab -> Schedule).
When creating the schedule, the Enable checkbox should be on. The name can be anything, give it a name that means something to you, perhaps "KidsSchedule". I named one network "OffFrom1amto6am". Another good name might be "Off-10pm-on-8am". Firmware 7 comes with two already-defined schedules. Most likely you will want to create a Custom schedule. You define the schedule by clicking in a bunch of green squares, each square representing 30 minutes. A green square with a check in it means the schedule is ON for those 30 minutes. A gray square with an X in it, means the Schedule is OFF. Turning off the Internet on school days at 9PM but leaving it on until 11PM on weekends is easily done. Save the schedule when you are done.
Next, assign the kids wireless network (SSID) to the schedule. From the AP tab, click on the name of the network. Again, the scheduling feature is called "Enable". Turn this on by checking the checkbox and all the defined schedules will be available. Save the changes, when you are done. Should things change in the future, you can change the schedule. Or, if need be, disable the schedule entirely. Or, assign the kids network to a different schedule. Nothing is carved in stone.
When a schedule changes the state of a network, a record is written to the Event Log as shown below. In this case two SSIDs were turned off at 1AM and back on at 6AM.

If you can get up to speed on VLANs, it would probably be a good idea to segregate the kids into their own VLAN too. For advanced credit :-)
DNS
DNS is important. To get up to speed on the concepts, the Test Your DNS page has both a short and a long introduction to the topic.
You do not need to change DNS servers, but it's a good thing to do. I say this because it is preferable to use DNS servers from a professionally run organization rather than from your ISP. Three good choices are Cloudflare (1.1.1.1 and 1.0.0.1), Quad9 (9.9.9.9 and 149.112.112.112) and OpenDNS (208.67.220.220 and 208.67.222.222). Google is a popular choice (8.8.8.8 and 8.8.4.4) but some people feel they know too much about us already.
To configure your router to use one of these companies, start at the Dashboard page, then click on the gray Details button for the WAN (i.e. Internet) connection. Turn off the "Obtain DNS server address automatically" checkbox. Turn on the checkbox for "Use the following DNS server address(es)" and enter the IP addresses of your preferred company. Finally, click the Save and Apply button at the bottom.
By default, devices connected to the Surf SOHO see the router as their DNS server. That is, they do not see the IP addresses for Cloudflare, Quad9, OpenDNS or Google. In techie terms, the router is acting as a DNS proxy. You configure this here: Network tab -> Network Settings -> DNS Proxy Settings -> Enable checkbox. You can turn off this checkbox, but I would leave it on because this lets you configure Local DNS records. I would also turn on the DNS caching checkbox and turn off the option to "Include Google Public DNS Servers"
That said, DNS gets very complicated which is why the DNS tester page is one of the most popular pages on this site. There are more DNS options in the router, two generations of DNS that work quite differently and both your computer and web browser have their own DNS options. It's like a 3-way arm wrestling contest.
What we just did was configure the DNS servers for the WAN/Internet connection. This is all that is needed initially. For an initial setup, you can ignore the following sections on DNS Blocking and Advanced DNS.
DNS BLOCKING (not needed initially)
Having the router serve as the DNS proxy (for old DNS), lets us use DNS to block certain websites. Peplink offers three ways to block websites, each with its pros and cons. You get to the Local DNS records, as shown below (firmware version 8), with: Network tab -> Network Settings -> Local DNS Records. To block a particular website (really any computer with a name) just assign it to either IP address: 127.0.0.1 or 0.0.0.0.

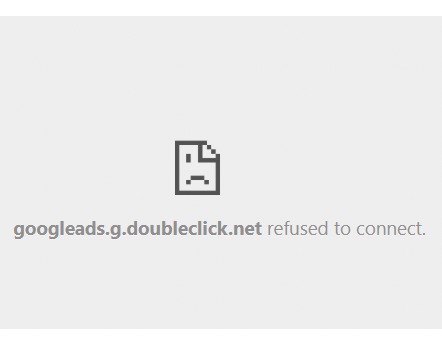
The upside of DNS blocking is that access to the named computer is blocked for all protocols. The named computer can be a website, or an FTP site or an email server or anything else. No matter what it is, access is blocked. Another type of blocking offered by the router (Content Blocking) only applies to websites. On the downside, there is no logging of DNS blocking. Also, it is very specific, perhaps too much so. For example, in the screen shot above we see it blocking ad.tagdelivery.com. This does not block ad2.tagdelivery.com or xyz.tagdelivery.com. So, this can lead to whack-a-mole. To see the blocking in action, this might be the result of blocking googleads.g.doubleclick.net.
If there are Windows 10 computers on your network, you might want to use DNS to block v10.events.data.microsoft.com using DNS. I ran across this while tracking DNS requests made by a Windows 10 computer while it sat idle. This is one of many domains that Windows 10 phones home to while spying on us. A couple others are browser.events.data.msn.com and watson.telemetry.microsoft.com. More Windows 10 domains you might want to block are here: Enrolling devices in Windows Analytics and Configure Windows diagnostic data in your organization and Windows Analytics connectivity tests.
If you read this September 2019 article, Brave uncovers Google's GDPR workaround you may want to use DNS to block pagead2.googlesyndication.com.
If you use Microsoft Office and read this What is the domain nrb.footprintdns.com? and you don't want Microsoft spying on you, then perhaps use DNS to block nrb.footprintdns.com.
This January 2020 article describes how bad guys create fake web pages at sway.office.com, and since this domain really belongs to Microsoft, it fools both people and defensive software. Perhaps assign sway.office.com to IP address 0.0.0.0 to insure it can never be used on your local network.
In May 2023 security company Eclypsium discovered that Windows computers with Gigabyte motherboards have a back door. See Supply Chain Risk from Gigabyte App Center Backdoor. The problem is with software from Gigabyte that was intended to update the motherboard firmware. But, it was done poorly and the process can be hacked. To protect all the devices on your network, you can use DNS to block access to mb.download.gigabyte.com.
If you want to block Facebook, a good place to start is with: www.facebook.com, web.facebook.com, facebook.com, staticxx.facebook.com, graph.facebook.com, connect.facebook.net, apps.facebook.com and fbshare.me.
Note here the need to block multiple sub-domains within the facebook.com domain (www, web, staticxx, graph, connect and apps). This is the nature of DNS based blocking, it only blocks one sub-domain at a time; a bit like playing whack-a-mole.
One place where this specificity is an asset, is in blocking the telemetry and ads on a Roku box. There are many articles, such as this one that discuss specific Roku computers that you can block without a noticeable affect. I can vouch for the fact that blocking scribe.logs.roku.com and cooper.logs.roku.com (from here) does not interfere with anything. That article suggests other Roku domains to block such as amoeba.web.roku.com, ads.roku.com and p.ads.roku.com. This also illustrates a downside, the lack of auditing.
In February 2021 malware called Silver Sparrow was discovered on macOS computers. See Clipping Silver Sparrow’s wings: Outing macOS malware before it takes flight. You can create DNS entries in the router to block the malware from phoning home. In this case, block api.mobiletraits.com, api.specialattributes.com, specialattributes.s3.amazonaws.com and mobiletraits.s3.amazonaws.com.
Another configuration option, as per SquidBlackList.org might be to force Google safe search with a dns entry for *.google.com that points to 216.239.38.120.
There are many publicly available lists of bad domains and sub-domains. One is the Steven Black hosts file. It's huge. It assigns bad things to IP address 0.0.0.0 instead of 127.0.0.1. Both work, I don't know which is better. To block Amazon ads, it blocks fls-na.amazon-adsystem.com, rcm-eu.amazon-adsystem.com, ws-eu.amazon-adsystem.com, wms-eu.amazon-adsystem.com and probably more. It's endless.
ADVANVED DNS OPTIONS
On the LAN side, all routers offer a private network, Peplink calls this the untagged LAN. Peplink also offers many Virtual LANs (VLANs). I have a whole page on VLANs. Peplink allows each LAN side group to use different DNS servers. That is, the private network can use Cloudflare for DNS, one VLAN can use Google for DNS and another VLAN can use OpenDNS for DNS. This can be helpful when dealing with children as some DNS providers filter out things that children should not be exposed to. Give children their own SSID assigned to their own VLAN and they can use restrictive DNS servers.
You control whether a VLAN or the private network uses its own DNS servers vs. those defined for the WAN connection with an option called "Assign DNS server automatically". This option is a property of each VLAN and the private network. You see it at: Network tab -> Network settings -> LAN section -> click on any LAN. When this option is ON, the DNS servers for the WAN connection are used. When it is off, you can enter the IP addresses of two DNS servers that will only be used in that "group".
There is yet another hammer in the Peplink DNS toolbox, the strongest one of all.
Normally the DNS servers that the router is configured to use are given to devices that connect to the router via DHCP, along with a temporary IP address. However, devices can be manually configured to use whatever DNS servers they want, regardless of what the router is using. So, for example, if parents configure their router to use DNS servers that block porn, the kids can change their computers to use other DNS servers that don't block anything. I have seen a Roku box make DNS requests to Google's DNS server rather the DNS servers given out by the router. I have also seen Windows 10 try to phone home to a private Microsoft DNS server as a way around some blocking.
Peplink routers have the ability to seize control of all old-style DNS requests (more on old DNS vs. new DNS below). Regardless of how the kids have configured their computing devices, as long as they connect to the Surf SOHO it sees their DNS requests and it can, optionally, re-route them to the WAN DNS servers the router is configured to use. This option over-rides any custom DNS servers configured for the private network or a single VLAN.
Not only is this the biggest hammer, it also hides itself. Devices connected to the router are fooled into thinking they are using the same DNS servers that they always were, whether they came from a LAN/VLAN definition or if they were hard coded on the device itself. Everything on the LAN side looks like the big hammer is not being used. Every log, every trace. The fake-out only happens when the DNS request leaves the WAN port. This forces kids to hack into the neighbors Wi-Fi network for their porn :-) But again, this is only applies to old (not secure) DNS.
To use the big hammer and force all devices connected to the router to use the WAN DNS servers from the router, the router must first be set up as the DNS proxy (see above). Then, you have to enable DNS forwarding, which is off by default. To do this in Firmware 8: Advanced tab -> Service forwarding -> DNS Forwarding Setup -> and turn on the checkbox for "Forward Outgoing DNS Requests to Local DNS Proxy". Then click the gray Save button and Apply Changes. There is no need for any of the other types of Service Forwarding.
Another benefit of forcing all devices to use the DNS servers in the router is that malicious software sometimes uses DNS requests to phone home to the Command and Control (C2) server. Imposing your preferred DNS servers prevents malware from contacting the DNS servers run by the bad guys.
The downside to forcing DNS on all clients is that this over-rides the DNS servers for a VLAN.
NEW DNS
DNS is changing, drastically. Old/legacy DNS is in plain text and always uses port 53. New DNS is encrypted and uses either port 443 or 853. New DNS uses one of two new protocols DNS over TLS (DoT) and DNS over HTTPS (DoH). Because new DNS requests that originate on one of your computing devices are encrypted, the router can not see inside them to impose any rules. If the kids can configure a web browser to use new DNS, they get their porn back. As of 2021, the only operating systems that can use new DNS system-wide are Android 9, 10, 11 and 12. It is coming to Windows 10, some day. On other systems, some browsers support the new encrypted DNS and some do not. There is a topic on Encrypted DNS on my DefensiveComputingChecklist.com site.
As of firmware version 8.1.2 (from June 2021) Peplink offered no configuration options for new DNS. They finally introduced it in firmware 8.2.0 (early 2022, give or take). On the Network tab, go to WAN, then DNS over HTTPS. You can choose from Cloudflare, Quad9, Google DNS or OpenDNS. Better yet, use a Custom URL with NextDNS. If you do use a Custom URL, it also asks for a pair of IP v4 addresses. Beats me why. Just Ping your custom URL to learn its lone IP address or a couple valid IP addresses for it. This strikes me as a great new security feature since it means your ISP will see no longer see any old-school DNS activity. Your ISP may still spy on you, but if the router is using new encrypted DNS on the WAN side, the ISP can not use DNS to spy on you. It also prevents the ISP from modifying DNS requests.
One huge limitation to all blocking in the router (not just old DNS blocking) is that both a VPN and Tor are unaffected. In each case, just as with new DNS, the router never sees the DNS requests, all it sees is encrypted data to the VPN server or to the Tor entry node. Don't tell the kids.
FIREWALL RULES
The ability to configure inbound and outbound firewall rules is one of the best features of the Pepwave Surf SOHO router (and all Peplink routers). However, for an initial setup, you can skip all firewall rules. None of them are required for the router to function. The rules just add more safety.
INCOMING FIREWALL
As it should, the Surf SOHO defaults to blocking all unsolicited incoming connections. An initial look at the firewall rules is confusing, as the lone default rule looks like it lets everything in, but it does not.
To open a port, again as with any router, you use Port Forwarding (Advanced tab -> Port Forwarding). This requires a static IP address on the LAN side, which is another nice default of the Surf SOHO - devices using DHCP (which is most devices) get assigned the same IP address every time they join they network. You can force this to always be true using the DHCP Reservation feature. Go Network -> Network settings and click on either the untagged LAN or a VLAN. DHCP Reservation is the last field in the DHCP Server section. You specify the MAC address, IP address and a name for the computer. Other than VLAN support, this is standard stuff.
A rare feature that the Surf SOHO offers is logging of port forwarding activity. This is not configured when the port forwarding is defined, instead it requires an inbound firewall rule (Advanced tab -> Access Rules -> Inbound Firewall Rules). Set the destination IP address the same as the Port Forwarding rule, make it an Allow rule and enable Event Logging. If this creates too much data, logging can be restricted by source IP address(s). I have found this to be a great auditing tool for remote access to computers behind the router. It can also tighten up the security of remote access by limiting the source IP network(s).
OUTGOING FIREWALL RULES
To create an outgoing firewall rule, go to Advanced -> Access Rules -> Outbound Firewall Rules. Some things you might want to block with outbound firewall rules are private IP addresses, malicious IP addresses, data packets with an invalid FROM IP address and Windows file sharing. All are explained below. Note that outbound firewall rules are evaluated top to bottom. Once one rule applies, all the remaining rules are ignored. If, for example, the first/top rule said that no data was allowed to leave if it was destined for IP address 1.2.3.4, and the second rule said that it was OK to contact IP address 1.2.3.4, the second rule would always be ignored.
BLOCKING PRIVATE IP ADDRESSES

Most IP addresses are used on the public Internet but some are reserved for internal use only. Internal IP addresses will be dropped by the routers that run the Internet. They are only intended for Local Area Networks (LANs). You might think that a router would, on its own, block the internal IP addresses from the Internet, but the Surf SOHO does not. I doubt that any routers do, by default. There are three groups of internal-only IP addresses.
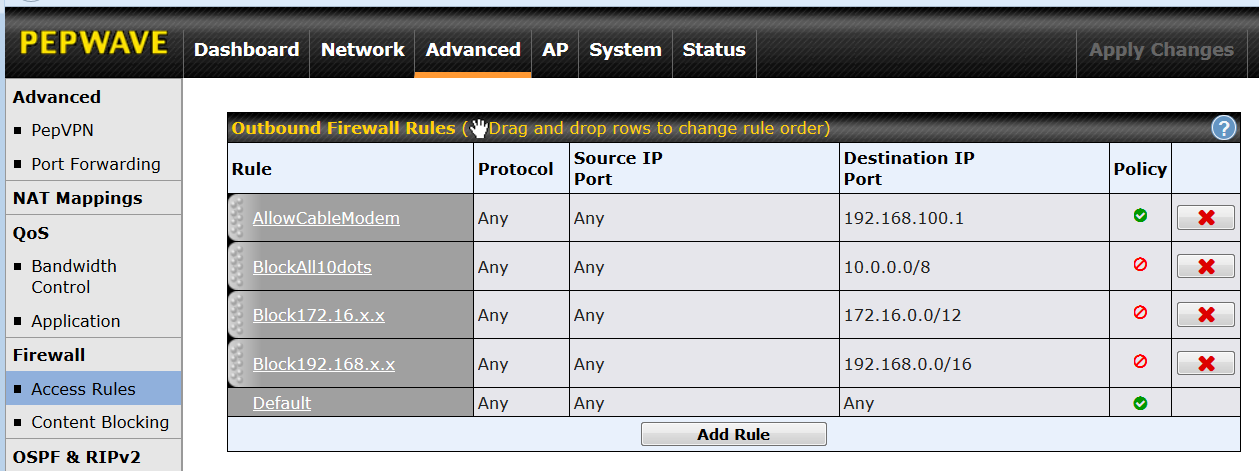
One group are the IP addresses that start with 192.168. To block the router from sending a request for these IP addresses out the WAN/Internet port, create an outbound firewall rule with a Destination of Network, an IP of 192.168.0.0 and a Mask of 255.255.0.0 (/16) as shown above. Make the Action Deny and turn on Event Logging. The rule name can be anything, a good one might be Block-192.168.x.x. Below you can see what it looks like, along with some other outbound firewall rules.
The Action column in this display was updated in firmware 8.1. The red circle with a line through it still means the rule is one that blocks, this has always been true. The black square around some of the rules below is supposed to be a piece of paper and it indicates whether the rule will be logged or not when it is invoked.

Another group of internal-only IP addresses are those that start with 10. To block these from leaving the router, create a firewall rule with a Destination of Network, an IP of 10.0.0.0 and a Netmask of 255.0.0.0(/8). Again, the Action should be Deny and I would turn on Event logging. A good rule name might be Block-10.x.x.x (as shown above).
Another clump of internal-only IP addresses start with 172.16. To block communication with them, create a rule with a destination network of 172.16.0.0 and a Netmask of 255.240.0.0(/12). In the screen shot above, the rule name is Block-172.16.x.x.
Still another set of LAN-side-only IP addresses are used for "link-local addressing." When a device joins a network and everything goes wrong, the device will probably assign itself one of these link-local IP addresses. You can think of these IP addresses like a spare tire in the trunk, they only are only brought out when needed. The outbound firewall rule to block them would target a network of 169.254.0.0 with a Netmask of 255.255.0.0(/16).
A single IP address (not a network) to block is 224.0.0.251. It too, is a reserved address, meant for internal LAN side use only. Specifically, it is used by the mDNS protocol on UDP port 5353. When blocking a single IP address, there is no network mask to deal with. If you really want to lock things down, you could also block outbound use of UDP port 5353 to any IP address.
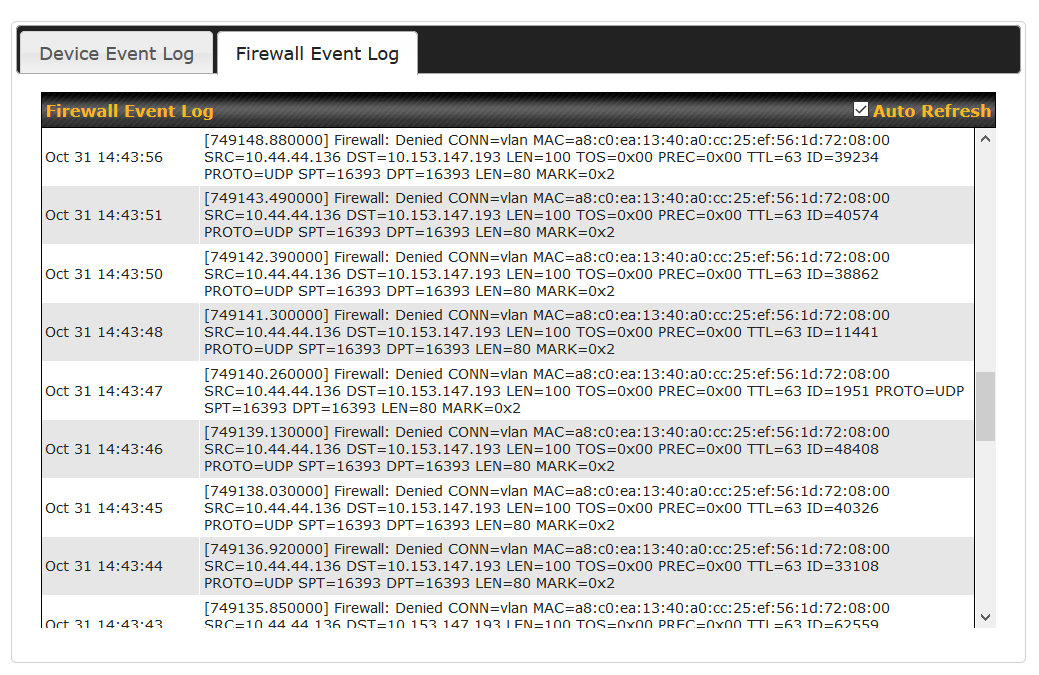
I suggest turning on logging for the above rules as I have seen many strange things caught by the rules. Most of them, I can not explain but I feel good having blocked them. For example, see this screen shot of the Firewall Event Log on a Surf SOHO running firmware 8.1. It shows multiple instances of the device with IP address 10.44.44.136 trying to phone home to IP address 10.153.147.193 using UDP to port number 16393. The device was an iPhone running iOS version 12 and doing Facetime. The need to contact an internal-only IP address makes no sense to me at all and Facetime worked just fine without it. A bug in iOS? The US Government spying on me? Don't know, don't need to care, as the traffic never left the router.
One exception to the above is your modem. Modems are computers with a web interface. The modems I have used over the years all used 192.168.100.1 as their internal IP address. Others use 10.0.0.1, 10.1.10.1 or 192.168.0.1. So, do you want to block access to your modem? Sometimes, yes. Sometimes, no. I blogged about this back in 2015, see: Talk to your modem and Using a router to block a modem.
If you want your modem blocked, then the rules just discussed, do the job. If however, you want to be able to access a modem, you need to carve out an exception. Assuming the modem is 192.168.100.1, you need to create an outbound firewall rule with an Action of Allow and a Destination of the single IP address of your modem. The rules are processed top down, so place this rule above the one blocking all IP addresses that start with 192.168.anything. Click here for an example of what this looks like. The rule is called AllowCableModem.
BLOCKING MALICIOUS IP ADDRESSES
In the screen shot above the firewall rule called BlokRussia.87.251xx blocks all outbound data to IP addresses that start with 87.251. My routers have been attacked/probed from these IP addresses too often, and I don't want anything on my LAN to communicate with them, for any reason.
In May 2019, I blogged about incoming probes/attacks on my router (Barbarians at the Gate) and I noticed some bad neighborhoods on the Internet. That is, many attacks came from a couple IP ranges in Russia. So, maybe block all devices on your network from communicating with these IP address. Specifically, block 81.22.45.* (or more aggressively 81.22.*.*) and 185.176.26.* (or 185.176.*.*). For more on this notation, see the section on subnet masks on the IP address page.
IP 81.22.45.0 Mask 255.255.255.0/ (/24)
IP 81.22.0.0 Mask 255.255.0.0/ (/16)
BLOCKING IP ADDRESSES FROM AN INVALID SOURCE (added June 2020, updated October 2020)
Feel free not to bother with the bottom four rules in the screen shot above. They are a different type of sanity check on network traffic. They insure that all data leaving the router has a valid "from" IP address. Let me explain:
To be clear, I am referring to the bottom 4 rules, excluding the one really at the bottom (labeled Default). This default rule is the out of the box profile for every new router. Simply put, it lets all data leave the LAN and head out to the Internet. In the screen shot above, it will never come into play because the "NotFromMyNetworks" rule has the exact same conditions and is higher in the list. I could have modified the last/Default rule to also block and log, I did not need to create the "NotFromMyNetworks" rule. Six of one, half a dozen of the other.
The router in question has three valid subnets. The untagged LAN is 192.168.8.x. One VLAN uses 192.168.9.x and another VLAN uses 10.44.44.x. The three rules that start with "OK" test for these subnets and let data leave the router without logging. Dull and boring. The interesting rule is the last one, the one named NotFromMyNetworks. It blocks and logs everything. Of course, this rule should never be hit. In theory, that is. I have started adding a group of rules like this on routers that I manage because I do see the bottom rule getting invoked. Why? One reason is some network fudging Google does with Android apps on a Chromebook. Another instance seems to be a software bug. Whatever the reason, I feel safer blocking anything with an invalid source/from IP address.
Be aware: If you want to block IP addresses from an invalid source, these rules (at least two are needed) must be at the bottom of your list of of outbound firewall rules. Must. Must. Must.
One invalid source IP address that I see consistently and repeatedly is 100.115.92.1. You may want to test for this and block it from leaving the router. I used to also log it, but, at times, it flooded the logs, so now I just block it. This IP address appears whenever I use a Chromebook running Android apps. I do not fully understand why it happens, but the pattern is consistent and others have seen this too. So far, blocking it has not caused me a problem when using a Chromebook.
- - - - - - - - - -

BLOCKING WINDOWS FILE SHARING
Windows SMB based file sharing is a LAN side thing. It does not belong on the Internet and Outbound Firewall rules can insure that it never leaves your LAN. I am no expert on this and have read differing accounts of the ports involved with Windows file sharing. The full list of suggested ports to block is: UDP ports 137, 138, 139 and 445 and TCP ports 139 and 445. I suggest turning on logging for these rules. For more see SMB Security Best Practices (March 2017) and Vulnerability Note VU#824672 Microsoft Windows automatically executes code specified in shortcut files (Aug 2017). FYI: In 2019, I caught some strange traffic from the Brave browser on UDP port 137 thanks to these rules. Since then, I have continued to see occasional outbound traffic to UDP port 137 from my computers. I have no idea why, but I feel safer having blocked it.
OTHER STUFF TO BLOCK
While this October 2022 report from the Canadian Centre for Cyber Security Routers cyber security best practices mostly rounds up the usual suspects, it also includes suggestions for outbound firewall rules. Specifically: block TCP and UDP port 135 (Microsoft RPC), TCP and UDP ports 137-139 (NetBIOS/IP), TCP port 445 (SMB/IP), UDP port 69 (Trivial File Transfer Protocol), UDP port 514 (syslog), UDP ports 161-162 (Simple Network Management Protocol) and TCP ports 6660-6669 (Internet Relay Chat). These firewall suggestions came from another article, by Chris Brenton: Egress Filtering FAQ. Egress is nerd lingo for outbound. In that article Brenton (formerly of SANS) also suggests blocking outbound TCP port 25 (Email SMTP) and assorted ICMP traffic. Peplink makes blocking ICMP traffic easy. If nothing else, this article is useful for its explanation of why these things should be blocked.
In November 2020, respected hacker Samy Kamkar released new research on NAT Slipstreaming that could punch a hole in the firewall of a router and give bad guys access to a single computer. Then, in January 2021, Kamkar and others expanded on this with what they called NAT Slipstreaming version 2.0 which could poke a hole allowing access to any LAN side device. An outbound firewall rule that blocks TCP requests to ports 1720 and 5060 is one defense against these issues. Anyone who wants to be really aggressive about these issues should also block outbound TCP requests to ports 69, 137, 161, 1719, 1723, 6566 and 5061.
In April 2019, we learned of security flaws in iLnkP2P software found in millions of IoT devices. Long story short, you can defend against this by blocking outbound UDP requests to port 32100. For more see my blog Why I like my router.
If you own a Roku box, I discovered in March 2021 that it makes outgoing TCP connections to port 2350. This is a not a common port, so the data could be anything. I found that blocking the Roku box from making outgoing requests on TCP port 2350 had no visible affect. I tried a few different Roku channels and they all worked normally.
Printers: I mention printers here to suggest that you prevent a network printer from phoning home to insure that it is not spying on you. This first requires giving the printer a fixed IP address which can be done in two ways: either on the printer or in the router. Configuring this in the router is probably better because every printer may not support a fixed IP address and if the network where the printer lives ever changes, it's that much harder to deal with. In firmware 8, you do this in Network tab -> Network Settings (under LAN). Click on either the Untagged Private LAN (or whatever you called it) or the VLAN where the printer resides. Then, go to DHCP Reservation.
This marries a MAC address to a static (unchanging) IP address. The MAC address of the printer can be obtained either from the printer or by displaying the devices connected to the Surf SOHO. Once the IP address of the printer is fixed (aka static, aka reserved) then, you can create an Outbound Firewall Rule that blocks that IP address from ever making an outbound connection. That said, from time to time you may want to check for updated printer firmware, so the outbound firewall rule will have to be temporarily disabled. In October 2019, I saw a printer-blocking firewall rule prevent a Brother all-in-one from making outbound connections to these IP addresses: 52.17.248.236, 52.30.15.242, 52.209.122.44, 52.209.52.81, 54.171.32.149, 54.229.253.235 and 99.80.126.111.
If you own an HP printer, there is another reason to block its Internet access. This article Hints for HP Printer Firmware Downgrade (January 2021) documents how firmware updates to some HP printers include a new feature that blocks the use of third party ink cartridges. Good for HP, bad for you.
Printers may not be the only devices you want to keep in-house. Blocking a video camera, for example, insures that you can't be spied on from the outside (advice, you will not see anywhere else). In March 2022, we learned that some APC Smart-UPS devices connected to the Internet and were buggy as heck. The devices automatically connect to the Schneider Electric (they own APC) cloud, a feature called SmartConnect. The bugs allow a bad guy to disable, disrupt or destroy vulnerable APC Smart-UPS devices.
MORE POTENTIAL FIREWALL OPTIONS
A relatively new criteria in a firewall rule is that of a Grouped Network. This is a group of IP addresses and it can be specified as either the source or destination in a Firewall rule. What defines a group? Anything you want.
Firewall rules in Peplink routers can be based on more than just IP addresses.
The can, for example, have a destination of a domain name. I do this for one domain. At times, I log all the DNS requests made by my everyday Windows computer. This logging has shown that Windows calls out to www.bing.com on its own. That is, I saw the DNS requests for www.bing.com even when I was not using the site. So, I set a firewall rule to block it. The problem with this has been the Peplink log - it does not list the domain name. When the rule gets triggered and a log entry is made, all the log has is the target IP address. Its up to me to figure out that the IP address is www.bing.com.
It turns out this does not happen all that often. If it was common, I could have used DNS and set the IP address of www.bing.com to zero. But, there is no logging of DNS requests. Another upside to a firewall rule is that it can be scheduled. So, if there is a need to control what a child does on the Internet, you create domain based firewall rules for the domains they use the most often and schedule those rules to kick in at bedtime.
Rules can also be based on a MAC address. This is a 48 bit number assigned to every network adapter. Originally it was an Ethernet thing but it is also used with Wi-Fi. A laptop computer that does both Ethernet and Wi-Fi will have a different MAC address for each type of network. A MAC address is written in hexadecimal where the digits range from zero to F (yes the letter F).
There are many ways to learn the MAC address of a device connected to a Peplink router. The most obvious is the Client List. If it is not connected now but has been in the past, look for it in the System tab under Wake-on-LAN. Many LAN scanning programs can reveal the MAC address of devices on the network. Some devices have a sticker with their MAC address. You can expect a router to have one MAC address for the WAN port, one for the LAN ports and another for each Wi-Fi SSID.
Time has decreased the usefulness of a MAC address. Many operating systems no longer use the same MAC address forever. For example, Windows, macOS, Android and iOS now default to using a different MAC address on each different Wi-Fi network.
Firewall rules can include the protocols TCP, UDP, ICMP and others. These are too broad to be useful on their own, they are used in combination with other criteria.
CONTENT BLOCKING
Content blocking comes in two flavors: Web Blocking and Application Blocking. I have not found a use for Application Blocking, so everything I say here is about Web Blocking.

Web based Content Blocking is based on domain names rather than the IP addresses and port numbers used by Firewall rules. The router checks all HTTP and HTTPS traffic for blocked domains. To configure this, go to Advanced -> Content Blocking -> Web blocking. The screen shot above is from firmware 8.0.2.
You can either specify domains to block on your own, one by one, or use Peplink's pre-defined groups. The Adware group is the most interesting one to me but if children will use the router, the Pornography group is a must. Note that pre-defined groups are not supported on the first generation of Surf SOHO hardware.
Sadly the pre-defined groups seem like an incomplete feature. You can not provide your own list. You can not force an update to the domains in a group. You can not see when the group definitions were last updated. You can not see which, if any, domains are actually being blocked. In May 2020, it seemed to me that the last update to the domains in each group was made a year ago. In firmware 8.0.2 you can download the list of domains in each group here: Status tab -> Device -> Content Filtering Database.As for one a time domain blocking, the system is very flexible. For example, blocking scorecardresearch.com blocks anything that ends with scorecardresearch.com. That is, it blocks abc.scorecardresearch.com and def.scorecardresearch.com and anything.at.all.scorecardresearch.com. Some domains you might want to block are adnexus.net, amazon-adsystem.com and doubleclick.net.
In the section on DNS here, I suggest using DNS to block "v10.events.data.microsoft.com" because it is Microsoft telemetry/spying. But Windows also calls out other related sites: v10c.events.data.microsoft.com, v20.events.data.microsoft.com, umwatsonc.events.data.microsoft.com and self.events.data.microsoft.com. At some point, the better option is using Content Blocking to block all domains that end with events.data.microsoft.com.
FYI: To audit the DNS requests made by a Windows computer, I used DNSQuerySniffer, a free, portable program from Nir Sofer. Highly recommended.
Perhaps the most powerful aspect of Web Blocking is that it can block millions of domains at a time by specifying the Top Level Domain (TLD). For example, entering just "cn" blocks every website that ends with ".cn". Goodbye China. Likewise, entering "ru" blocks all Russian websites. Domains ending in "cm" are often malicious and easily blocked. Same for xyz. According to research in 2019 by Palo Alto networks you might want to block all domains ending in to, am, ki and nf.
The down side of Web Blocking is that it is only blocking websites (both HTTP and HTTPS). In contrast, DNS blocking blocks any and all access. But, DNS blocking only blocks one specific sub-domain at a time. That is, one DNS rule can be used to block a.b.michael.com and another one can block c.d.michael.com and yet another one can block something.michael.com but it can not block every possible sub-domain of michael.com. And, there is no limit to the number of sub-domains. In these examples, "a.b" and "c.d" and "something" are sub-domains of the michael.com domain.
In August 2019, 22 cities/towns in Texas were hit with ransomware. Afterwards, the incident responders offered some Defensive Computing advice, including blocking outbound network traffic to pastebin.com. To do so in Firmware v7 and v8: Advanced -> Content Blocking -> and set the Pre-set category to Custom. Then enter pastebin.com in the list of Customized Domains. Save the change, then Apply Changes.
To use the router to block Windows spying on you, see this Microsoft article Configure Windows diagnostic data in your organization and then you may want to use Content Blocking to block access to vortex-win.data.microsoft.com and telemetry.microsoft.com.
If you are concerned with online tracking, then you could block the domains in this list of tracking domains from Disconnect.me.
If you want to block ads/trackers on a particular website, consider using Blacklight from The Markup. Blacklight is a great online tester that shows details on the ads and trackers used by a website. In this small sample of the report for The New Times, we see that the site sends data to scorecardresearch.com, criteo.com and criteo.net.
INTERESTING STORY ABOUT BLOCKING
March 2022: Once upon a time, I subscribed to Paramount Plus for $10/month (no ads) and watched it on a Roku box. At first, all was well as I watched recent shows. Then, I tried to watch an old TV show and it failed. The error message simply said that something went wrong. Nothing useful, no error code. Tech support at Paramount+ was useless. The idea that some shows worked and another did not, was too much for them to even contemplate. The problem persisted for many days until I started to think that my router might be the problem. It was.
The problem was easy to re-create so I did some tracing. The support.cgi page offers full, detailed tracing of all the bits into and out of the router. I turned on the trace, tried to play an episode that I knew would fail, turned off the trace and looked at the trace data with WireShark. Most of the data was over my head, but it was easy to see the DNS requests made by the Roku box. Now that Peplink supports DoH, an easier way to get a trace of DNS requests is by using NextDNS for DoH and enable logging. Peplink also has a feature that traces requests but it is hard to use. The output does not go to the Event Log or the Firewall log, it has to be sent to an external log recording server (preferably on the LAN). I have done this using a Synology NAS as the data collector.
I saw that the Roku box made DNS requests to sb.scorecardresearch.com and pubads.g.doubleclick.net both of which were being blocked with Content Blocking. The trace showed the full gory details of the requests, but fortunately I did not have to dig that far, the DNS was enough.
To see if these were the problem, I created a Local DNS record for each of these subdomains with a valid IP address for the subdomain. You can get the IP address either with a Ping or with nslookup. In the case of scorecardreseach, Content Blocking was blocking scorecardresearch.com. This means that devices connected to the router can now access sb.scorecardresearch.com (thanks to Local DNS) but they can not access any other subdomains of scorecardresearch.com (due to Content Blocking). That is, no one can access x.scorecardresearch.com or y.scorecardresearch.com or anything.else.scorecardresearch.com.
With the Local DNS records in place, Paramount+ could now play the old TV show! Despite my paying extra to not see ads, it wanted to show ads before each episode of the old TV show. The only ad it actually played was a very short promo for Paramount Plus. As a side benefit, this test showed that Local DNS records are evaluated before Content Blocking.
But ... this still means that all the devices on my LAN can see ads from sb.scorecardresearch.com and pubads.g.doubleclick.net. I want to allow ads only on the Roku box. This can be done.
The first step is have the router always use the same IP address for the Roku box. This is exactly why we limit the DHCP range. On a Surf SOHO running firmware 8, you do this at Network tab -> LAN Network Settings -> Click on the untagged LAN (or a VLAN) -> DHCP Reservation. What Peplink calls "DHCP Reservation" is often called a fixed or static IP address.
Then, the Local DNS records can be deleted. Then, create four new outbound firewall rules, all based on a domain name.
- From the IP address of the Roku box, allow access to sb.scorecardresearch.com
- From anywhere else, block access to sb.scorecardresearch.com
- From the IP address of the Roku box, allow access to pubads.g.doubleclick.net
- From anywhere else, block access to pubads.g.doubleclick.net
This worked fine. It also pointed out the fact that firewall rules are evaluated before Content Blocking.
Finally, I decided to globally block doubleclick.net with Content Blocking. Paramount Plus still worked fine, all it really needed to access was sb.scorecardresearch.com.
USING NEXTDNS FOR DNS BLOCKING
Firmware 8.2, introduced in February 2022 added a new feature, secure DNS via DoH (DNS over HTTPS). This can be combined with NextDNS to offer another approach to DNS blocking.
One advantage of NextDNS is that it can create logs of DNS activity that exist outside of the router and thus are accessible from anywhere. It can also be used to provide ad and tracker blocking for all devices connected to a Peplink router. It is a cloud based version of Pi Hole. One problem with any blocking system is the inevitable mistake that it will eventually make. NextDNS solves this by offering both an allow list and a block list that lets you customize its pre-existing rules for what to block.
One downside is that NextDNS sees the router as a single device, so customization for specific connected devices is not possible.
FINAL THINGS
FYI: Firmware 8.3 introduced a new advanced setting called DPI (Deep Packet Inspection). You can see this on the support.cgi page. This January 2024 forum posting: Surf SOHO Mk3 with fw 8.3.0 - finally reliable seems to imply that turning on this DPI option is a bad thing. I have not tested this and I do not know if DPI is on or off by default. Worth checking if running firmware 8.3.something.
This is a good time to change a couple settings for your Internet connection (referred to in the router as WAN, for Wide Area Network the opposite of LAN or Local Area Network). Go to the Dashboard page (the home page, if you will) and click on the Details button for the WAN connection. NOTE: In firmware 8.1 the attributes of the WAN connection have moved to the Network tab.
It is a good idea to give the router some idea of the speed of your Internet connection. You can measure this at Fast.com or speedtest.net or many other websites. Speeds are normally measured and reported in Mbps (megabits/second). To configure this, look for "Upload Bandwidth" and "Download Bandwidth". Just above this is a "Reply to ICMP Ping" checkbox. It is on by default in firmware 7. You are a bit more hidden on-line if you turn this off (and do not reply to TCP/IP ping requests). Steve Gibson's ShieldsUP! service can be used to test the status of Ping replies.
The Balance line of routers is the main Peplink business. The name, Balance, refers to dealing with multiple Internet connections. The official buzzword for this is Multi WAN. Any router trying to balance traffic among multiple Intenet connections needs to know when one of those connections fails. Thus we have the Health Check feature. If you are using a Peplink router with a single Internet connection, there is no real need for an oft-repeated health check. Still, even with a single connection, I like to leave the Health Check enabled, so I know when my ISP has an outage even if I am not at home or I am sleeping. That said, my Health Checks do not need to be very frequent, one a minute or two is fine. Even if the Surf SOHO can only handle one Internet connection at a time, it does have the ability to fall back to a different connection should the main one fail. In that case, the Health Check so be more frequent. The default health check frequency is every 5 seconds (Health Check interval). As a rule of thumb, I would suggest either 60 or 120 seconds.
There are three Health Check Methods: Ping, DNS and HTTP. My preference is DNS or Ping. For either, consider testing against 1.1.1.1 (Cloudflare), 8.8.8.8 (Google), 9.9.9.9 (Quad9) and/or 208.67.222.222 (OpenDNS). The default Timeout value of 5 seconds seems fine. This is how long the router waits for a response from its Health Check probe. Six seconds with no response is considered a failure. The Health Check Retries field defines when the router treats the Internet connection as dead. By default, it waits for 3 failed Health Checks in a row. This seems fine to me. The Recovery Retries is the opposite, it defines when the router considers the Internet connection alive and well. By default, this happens after 3 consecutive good Health Checks. This default too, seems fine to me. When you are done with any Health Check changes, click the Save and apply button at the bottom of the window.
If the router has a fail-over Internet connection, and you set up the email feature, it will email you when there is an Internet outage. If there is just one Internet/WAN connection, it will email you about the outage, when the router is back on-line. For more on Health Checking see this Forum item: Health Check Mechanisms Against Link Failure.
UPnP and NAT-PMP are off by default which is the secure option. Still, it would be good to verify this with: Advanced Tab -> Port Forwarding -> UPnP / NAT-PMP Setting.
Another thing to verify is that SNMP is off, which it should be, by default. Do: System -> SNMP and verify that all four checkboxes are off.
Another nice option to enable is DHCP logging. DHCP is the process that gives out IP addresses, DNS servers and other techie data, to devices that connect to the router. The Peplink DHCP service can make an entry in the Event Log every time it hands out an IP address. In my experience this can come in handy. In March 2019, I blogged about how it helped to pinpointed a problem with a network switch. If nothing else, it's a nice audit trail of devices connecting to the router. You enable it with: Network -> Network Settings -> LAN section. Click on each Network/VLAN and in the DHCP Server section turn on the checkbox for DHCP Server Logging.
If you connect to the Internet via cable or DSL, then you should enable the DSL/Cable Optimization feature at Advanced tab -> Application. These two types of Internet connections are much faster down (to you) than up (away from you). Peplink says "When a DSL/cable circuit's uplink is congested, the download bandwidth will be affected. Users will not be able to download data in full speed until the uplink becomes less congested. The DSL/Cable Optimization can relieve such issue. When it is enabled, the download speed will become less affected by the upload traffic."
While in the Advanced tab, look too at the Service Passthrough section. The options there control assorted Application Layer Gateways (ALG). On firmware 8, the SIP gateway is always enabled and the ones for FTP and IPsec NAT-T are enabled by default. The options for H.323 and TFTP are off by default. I am no expert on this, but you are safer with them off. The problem is, disabling them may break something. I disabled FTP and was still able to use a secure FTP (SFTP) program just fine. IPsec is just one of many types of VPNs, so even if you use a VPN, disabling this may not cause a problem. All I can suggest is to try it.
Peplink routers can send you emails when things go wrong. The only error I have ever been notified about is when the Internet connection fails and when it is restored. The Surf SOHO only supports one Internet connection, so you won't get notified, obviously, until the Internet connection is working again. Higher end Peplink routers support multiple Internet connections, so you get notified of outages in real time. If you are using Peplink's VPN, it also emails about status changes with that, and, if the router is monitoring your monthly bandwidth usage, it will email when you are at 75% and 95% of the limit. The company claims that it will email you about newly available firmware, this has not been my experience.
Setup email notification at: System -> Email Notification. It requires the full techie details of an SMTP server, an account on that server and a port to contact the server on (465 works for me with SSL/TLS security). The Sender email address can be anything you want it to be. I use email with multiple Peplink routers, so I put something in the sender email address that identifies which router it came from (i.e. susanrouter@michaelhorowitz.com). There can also be multiple recipients, one on a line. There is an excellent test facility to test the configuration by sending a message. To use a Gmail account, see Enabling Email Notifications on Pepwave Devices by Mobile Must Have (April 2022). In brief, you have to enable both POP and app specific passwords for the Gmail account. Then, generate an new Gmail password just for email. Then, in the router, the SMTP server is smtp.gmail.com, the "Require authentication" checkbox must be on, the Security should be STARTTLS and the password is the one just for email. Their example shows it using 587.
For a bit of extra protection: Advanced tab -> Firewall -> Access Rules -> Intrusion Detection and DoS Prevention. Turn it on, it is off by default.
This is not very important, but unless and until there is a problem with your Internet connection, there is no need to have the Surf SOHO constantly monitor the quality of the connection. As of firmware 8, the default is to monitor the WAN Quality. Monitoring causes the router to send an outbound request to IP address 8.8.8.8, port 443, every six seconds. To disable monitoring: Network tab -> WAN -> WAN Quality Monitoring. The default is Auto. Change it to Custom and turn off all the Internet connection checkboxes. To see the results of any monitoring, go to Status tab -> WAN Quality.
Now that you have gone to all the trouble of configuring the router, it is a great time to save the current configuration. You can do this with System Tab -> Configuration -> Download Active Configurations -> gray Download button. This creates a .conf file on whatever computer you are using. The file name starts with the current date in yyyymmdd format.
INCONTROL2
Normal remote access to a router involves opening a port, poking a hole in the router firewall. I refer to this as an "inny" system because the router administrator directly connects in to the router. There are two problems with any such system. First, the router administrator must know either the public IP address of the router or use a Dynamic DNS system. Second, this leaves a port open and thus makes the router vulnerable.
In contrast, the InControl2 system from Peplink is an "outty" system (my term). With InControl2 the router maintains a constant connection out to Peplink so there are no open ports. You logon to the InControl2 website with a userid and password to administer the router, so there is no need to know either a DDNS name or a public IP address. InControl2 also, optionally, supports two factor authorization for added security.
Note: Peplink refers to their cloud-based management system as both InControl2 and InControl. Sometimes it is shortened to IC2.
InControl2 is not required for anything, so you can simply ignore it. Many people do not need it. One year of access to InControl2 is provided for free when you buy a Peplink router such as the Surf SOHO (same for their Access Points). After that, it costs $35/year for the Surf SOHO (higher end routers are more expensive). During your first year of router ownership, you can try InControl2 and form your own opinion. It makes the most sense when a non-techie person owns a Peplink router that is managed by a techie. It also makes sense for those owning many Peplink devices. If you don't want to use it, you should configure the router not to communicate with the InControl system. You do this at:
System tab -> InControl -> Controller Management Settings -> Disable (as of firmware 8.2).
Even if you don't want it or need InControl2, you should nonetheless create an account on the system (eventually, no immediate rush). Peplink devices have permanent serial numbers and it is best for you to lock your Peplink device to your InControl2 account. This prevents a bad guy from assigning the serial number of your router to their account. Even if a bad guy does this, as long as InControl2 is disabled in your router, you are safe. Still, two protections are better than one. Having an InControl2 account may also come in handy should you ever sell your Peplink router. As of firmware 8 (and perhaps earlier) you are now warned to sign up with InControl2 with a yellow message on the Dashboard (the main/first page of the web interface).
You can sign up at https://incontrol2.peplink.com. The system is keyed off an email address (any email address) and a password you create. Creating a new InControl2 account requires creating a group. Just make up any group name. Note that when you first logon, the system may not have the correct warranty period, it may take a day or two for the system to update itself. The free year starts when you buy the router, not when you first sign up for InControl2.
The extra year(s) of InControl are part of package Peplink calls Essential care. There are other, more expensive, packages for the ongoing care and feeding of Peplink devices. If you let your InControl subscription lapse, you can extend it, but note that the router must be online at the time and the use of InControl by the router must be enabled.
For more see: Do I need InControl? and InControl 2 Initial Setup Guide and What is an IC2 subscription and it’s relationship with Warranty Coverage?.
FYI: One thing that InControl2 can do that locally administering the router can not, is to set firewall rules based on the country of origin. See this Forum posting: How to configure a country-based firewall rule. Way cool.
Oh, the official term for an outty style of remote administration is cloud based remote access.
FYI: there is actually a third remote access system on Peplink routers. Hopefully, you will never need the third system, it is meant for Peplink technical support to access the router. I have to assume it was developed before the InControl2 system. Use of this system can only happen if you open a problem ticket with Peplink. Then, if their support person thinks it is worthwhile, they will ask you to enable Remote Assistance. Peplink routers can create a Diagnostic file that includes lots of information and there is a good chance it will provide enough information to their support staff. You have to create the file on your computer, and then submit it as part of the problem ticket. But, if the Diagnostic File is insufficient, you enable this remote access system at Status tab -> Device -> Remote Assistance. Needless to say, it is off by default. When it is enabled, there is a big warning on the Dashboard page.
REWARD
To see the reward for owning a Peplink router, see my April 2019 blog: Why i like my router, where I describe using assorted features in the router to respond to real world security issues.